
It's 7:15 on a school morning and your kitchen island is already doing three jobs at once. You're slicing fruit on one end, a laptop is open in the middle, and someone's eating toast where you just set down a hot pan. A wood kitchen island with seating can handle that kind of overlap, but only when the overhang, clearance, and finish match how people move around it.
Wood earns its place because it's warm to lean on, repairable when it gets dented, and less punishing than stone when a glass tips over. It also fails fast when you undersize the knee space or let stools block a dishwasher door. The National Kitchen and Bath Association Kitchen Planning Guidelines call for at least 24 inches of continuous counter width per seated person, so four seats need 96 inches of usable seating length before end panels or appliances eat into it.
The seven designs below are judged on that daily test, not on photos alone. Each one weighs seating comfort, circulation, and wood care for East Bay homes, where bright sun, dry air, and open plans put extra pressure on finishes.
Table of Contents
- 1. Butcher Block Island with Bar-Height Overhang
- 2. Live-Edge Slab Island with Waterfall Seating Edge
- 3. Shaker-Style Wood Island with Open Shelving Seating End
- 4. Reclaimed Barn Wood Island with Trestle or Corbel Base
- 5. Mid-Century Modern Walnut Island with Tapered Legs
- 6. Oak Island with Built-In Banquette or Bench Seating
- 7. Two-Tier Wood Island with Raised Bar and Lower Prep Counter
- How the Seven Wood Kitchen Island Designs Compare
- Choosing the Right Wood Island for Your Kitchen
1. Butcher Block Island with Bar-Height Overhang
If you cook most days and eat casually at the island, this is the workhorse I'd start with. A solid hardwood butcher block top in maple, oak, or walnut sits on a cabinet base, with the seating side pushed out for stools. It's forgiving under knives in the right spot, quieter than stone, and easy to sand back when life leaves marks.
Height decides whether people stay or perch for five minutes. The comparison in counter height versus bar height tables is useful here because a taller bar looks social but shortens how long kids and older guests sit comfortably. At standard counter height, plan deeper knee room; at bar height, you can use a shallower overhang and taller stools.
Making the seating work
- Overhang first: Give frequent diners a deep, supported overhang rather than a decorative lip, and test it with your actual stools pushed in and pulled out.
- Grain by job: Use end grain where you will cut, and edge grain for the main top where stability matters more.
- Seal the hidden edges: Oil the underside and end grain more heavily than the top, because steam and wet hands reach those spots first.
Say you're fitting seats along the long side in a Southern California farmhouse kitchen. Our guidance on planning seating for six at a kitchen island covers the stool math, but the practical check is simpler. Tape the island footprint on the floor, set chairs out as if someone's sitting, then open every appliance door. If you can't pass with a laundry basket, guests won't pass with plates. Refresh food safe mineral oil monthly at first, then when water stops beading.
2. Live-Edge Slab Island with Waterfall Seating Edge
A live edge slab is the opposite of a quiet workhorse. One thick piece of walnut, acacia, or oak keeps its natural contour on the seating side, and a waterfall end carries that slab down to the floor.
That drama comes with movement and weight you can't ignore. Let the wood acclimate indoors before fabrication, and use slotted or floating fasteners so it can move without splitting.
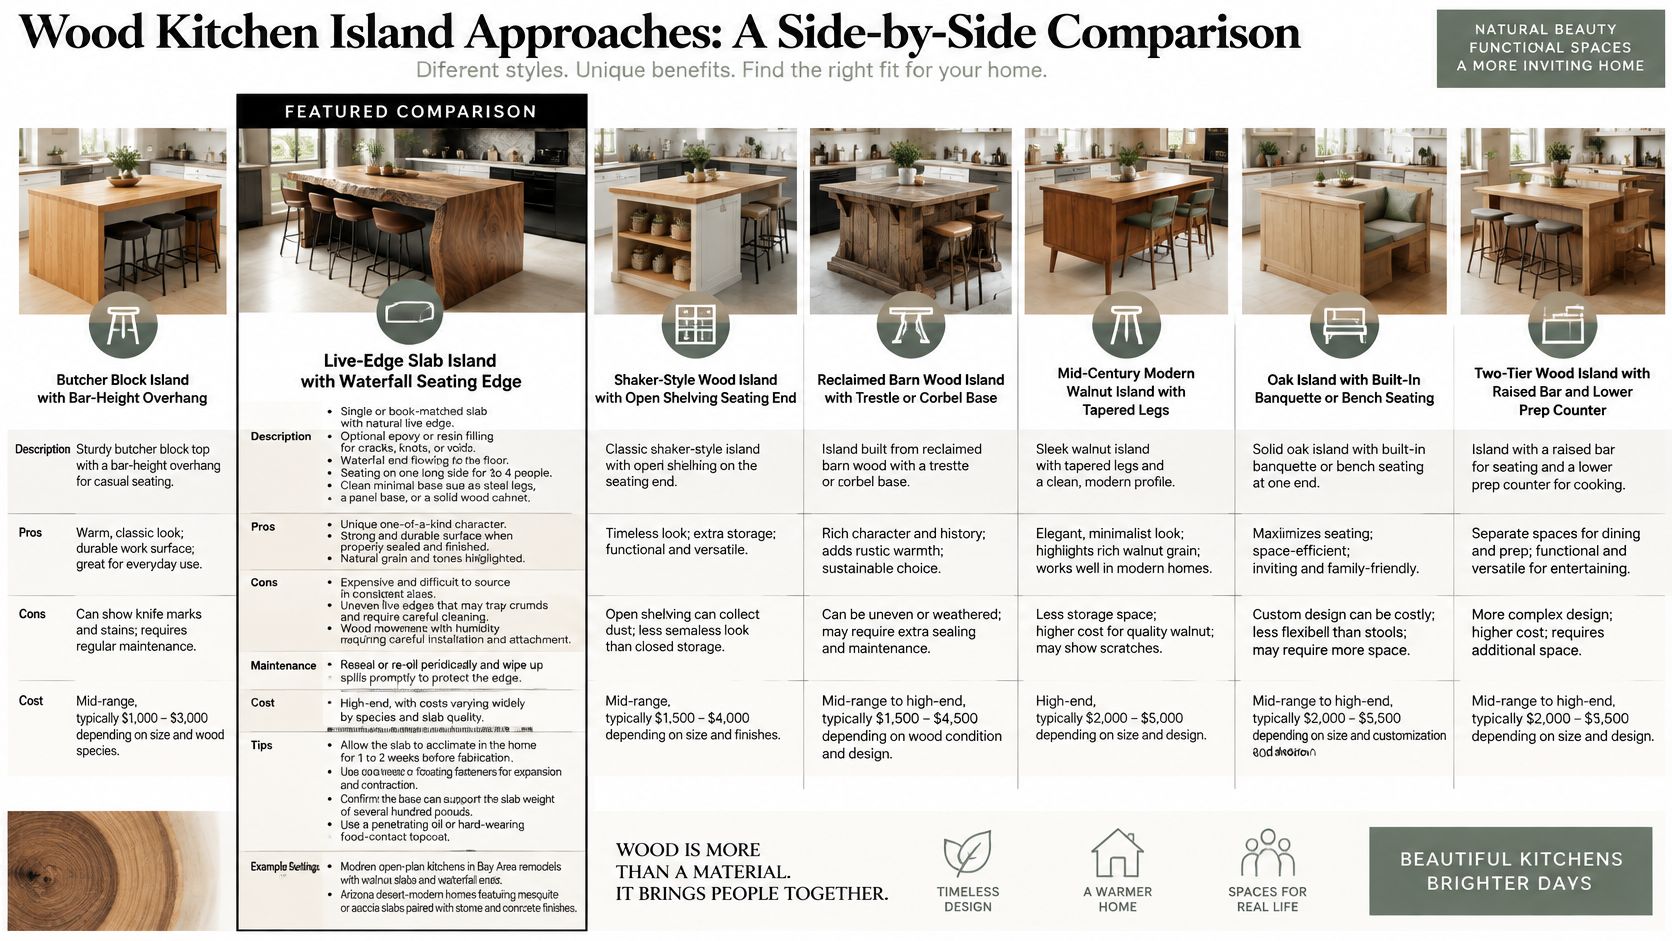
The comparison below helps you weigh this sculptural option against the other six before you commit to slab thickness and support.
Practical rule: Pick stools after the slab edge is final, not before. A wavy edge steals knee room in one spot and gives it back in another.
Confirm the base and floor structure can carry a top that may weigh several hundred pounds, and don't let the waterfall end block a seat you counted in the plan. I recommend a penetrating oil where you want touchable grain, or a hard wearing food contact topcoat where homework, coffee, and prep collide. The trade off is clear. You get unmatched character, but repairs and refinishing take more skill than a straight butcher block edge.
3. Shaker-Style Wood Island with Open Shelving Seating End
Shaker cabinetry survives trends because the framed panel door works in almost any house. Build the island in cherry, oak, or painted alder, extend a wood top on one side for seating, and put open shelving on the short end for cookbooks or baskets. In a California suburban remodel, it can match the wall cabinets.
Wood choice changes the maintenance conversation more than the door style does. Our comparison of cherry versus maple wood is worth reviewing before you pick, because cherry darkens with light while hard maple hides stool and shoe contact better on exposed seating parts. That's not a small detail. The seating face of an island takes knees, footrests, backpacks, and vacuum bumps every week.
Where Shaker islands go wrong
People often size the cabinet box, then squeeze stools into what's left. Do it in reverse. Set the seating frontage first, confirm stools tuck in without hitting door swing, then allocate drawers and shelves. The NKBA Kitchen Planning Guidelines specify 24 inches of seating width per diner and about 15 inches of knee space depth at a 36 inch counter, so a three seat island needs roughly 72 inches of usable frontage.
Use soft close hardware, keep open shelves away from the main traffic corner, and choose a contrasting island color only if you can touch it up easily. Painted alder looks clean, but a stained wood base hides scuffs better where stools live.
4. Reclaimed Barn Wood Island with Trestle or Corbel Base
Reclaimed boards bring dents, nail holes, and color shifts that new lumber rarely replicates. The trade-off is more inspection and upkeep than a new-wood top.
Before buying, check for active pests, rot, embedded metal, and musty odors. Giorgi Bros. Furniture's reclaimed wood guide can help distinguish sound character marks from damage that rules out a board. Use the reclaimed top for dining and serving, and keep a separate board for any cutting or food prep.
For seating, check the base before settling on a top. Corbels and trestle supports can interfere with knees, so position them outside the diners' leg space and secure the top with hidden brackets and fasteners. Set stool placement and clearance before fixing the base dimensions.
- Structure: Secure the top with hidden brackets and fasteners, and place corbels where they won't hit diners' knees.
- Cleaning: Grooves collect crumbs. Plan to clean them with a brush and vacuum, not just a quick wipe.
- Finish: Choose a food safe finish that can be renewed without stripping the entire top.
Pairing salvaged wood with new cabinetry takes some planning. The guide to best materials for kitchen cabinets can help you compare options for the storage around the island. Flatten the top enough for plates to sit steadily and ease sharp splinters. Expect more maintenance than with new oak, particularly if the reclaimed surface has deep grooves.
5. Mid-Century Modern Walnut Island with Tapered Legs
A slim walnut island on tapered or splayed legs reads more like furniture than cabinetry. You give up storage, but you gain visual air and easier cleaning underneath.
The example below shows the appeal, warm wood, simple stools, and nothing heavy closing in the room.
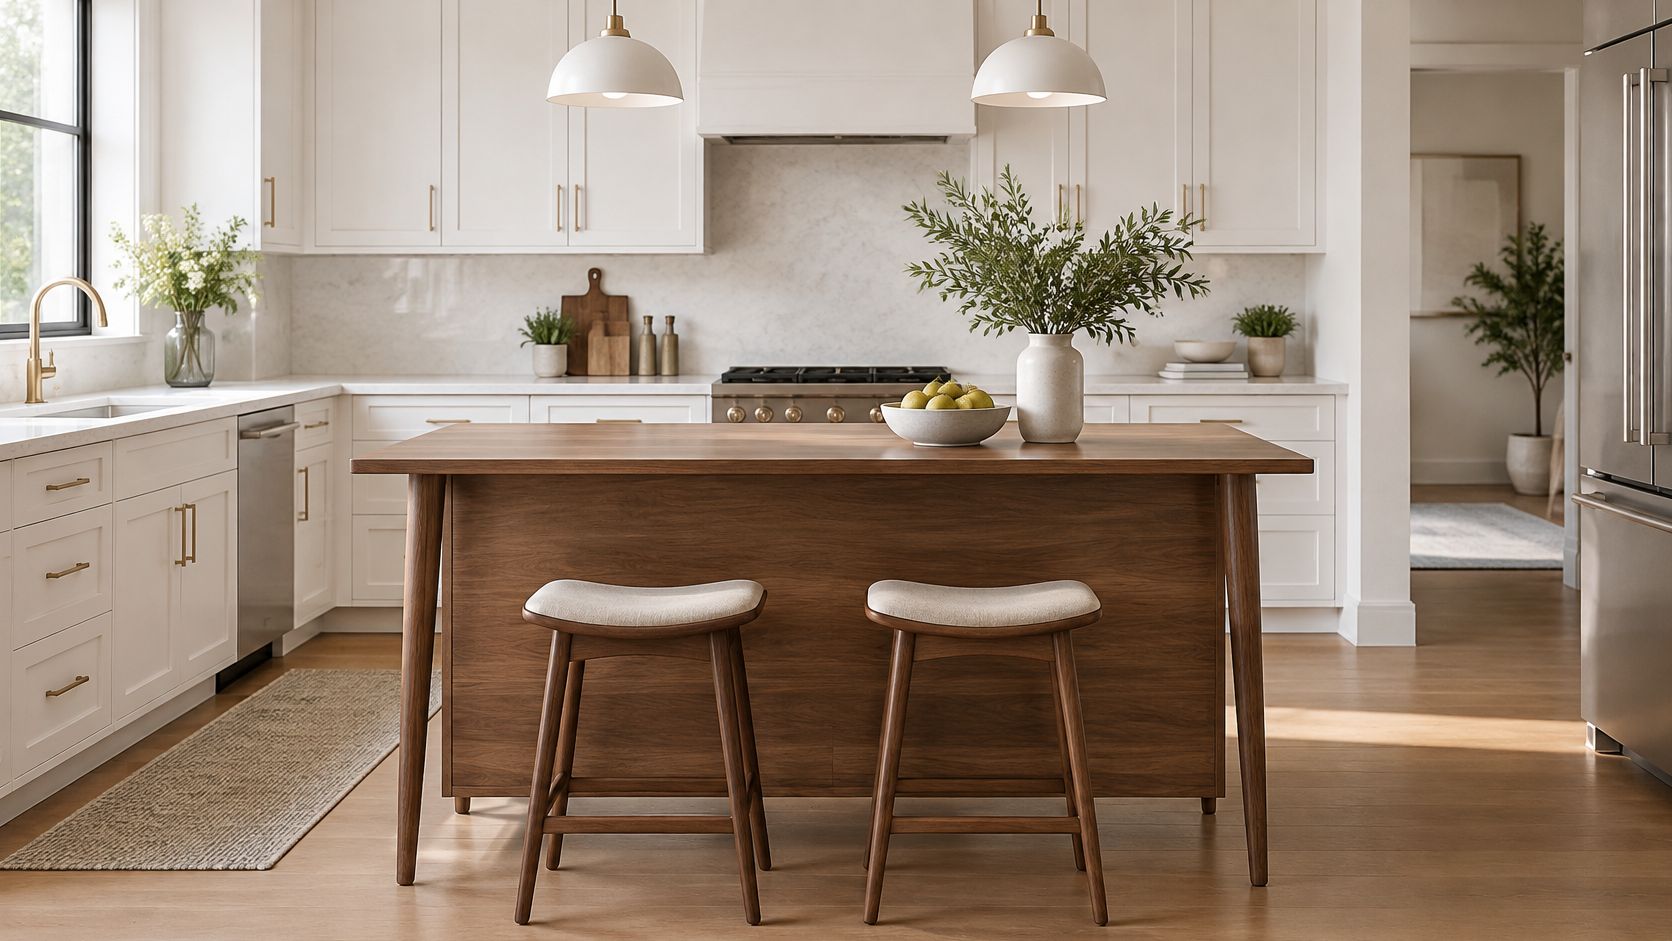
Don't let the slim profile fool you on structure. Wide tops need an apron or cross bracing to prevent sag, and leg placement decides whether stools slide in or fight the frame. Put legs where knees won't, confirm they clear floor outlets, and use a rounded or eased edge so forearms and hips don't catch a sharp corner.
A furniture style island works best when you admit it's a table with prep space, not a storage cabinet pretending to be light.
Say you need seating for two in a small urban kitchen. Two backless stools, a walnut top with seating on one side, and open space below can beat a bulky island that seats three badly. Choose a durable oil or hardwax finish you can refresh in place. Walnut will show pale dents if you abuse it, but spot repairs blend well, and that repairability is a real advantage over a brittle film finish.
6. Oak Island with Built-In Banquette or Bench Seating
A built in bench changes the island from a perch into a place people linger. Attach an oak bench with back support to one side, often in an L shape or peninsula, and kids can slide in for breakfast while adults keep a proper seat. California family additions use this well.
This photo shows the booth like effect, with the bench turning one side of the island into a dedicated eating spot.
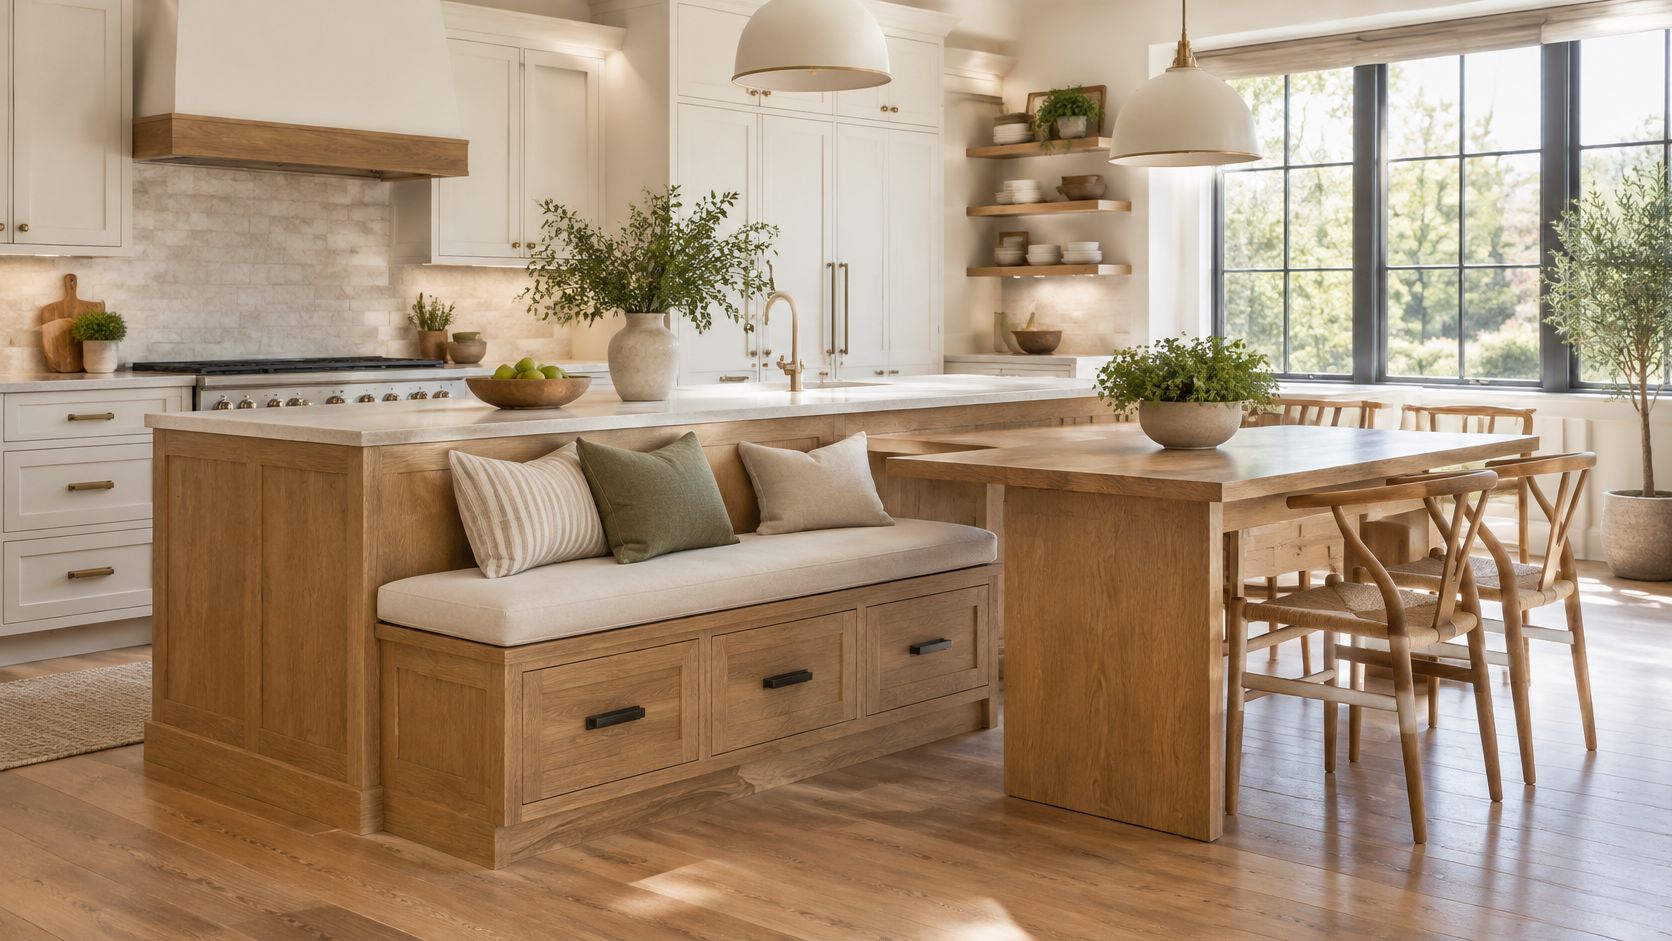
Comfort depends on the seat to counter relationship. Plan a dining style seat height with a standard counter, leave generous clearance behind the bench for people to get in and out, and don't trap the person in the middle. A bench seats more people in the same length than individual stools, but it fixes your layout, so traffic has to work on paper first.
Details families feel daily
Put outlets or USB charging where homework happens, not where chargers dangle into the walkway. Add storage under the bench only if the lids won't fight cushions and small fingers.
Demand for bigger islands supports this approach, since the 2025 Houzz US Kitchen Trends Study reports that 52% of upgraded US kitchen islands exceed 7 feet. Length helps, but I'd take a shorter bench with real back support over extra stools nobody wants.
7. Two-Tier Wood Island with Raised Bar and Lower Prep Counter
A two-tier island separates the work surface from the guest zone. Set drinks and phones on the raised bar while keeping the lower counter clear for prep. Oak and maple work well, as does wood paired with stone, but the extra level suits larger open kitchens where cooking and entertaining happen together.
Set the heights and clearances before choosing finishes. The raised bar reduces the usable prep area, adds demands on the island's support, and can make the lower counter feel cramped if the island is narrow. Keep the sink or cooktop on the lower level and seats at the raised bar. Where the upper surface extends beyond its base, plan adequate bracing. Put outlets on both levels so appliances and guest devices do not compete for one receptacle.
The structure and two countertop surfaces can take a substantial share of a remodel budget, along with cabinetry and electrical work. Define the tier layout before pricing decorative finishes. That decision affects the island's support, fabrication, and usable counter space.
- Workflow: Keep knives, hot pans, and raw food on the prep side. Give guests a clear place to set down drinks and phones on the bar.
- Access: Consider a lowered section if children, older adults, or anyone with limited mobility will use the island daily. Check that the approach and seating work for the people who will use it.
- Cleaning: Detail the joint between levels so crumbs and spills do not collect in a shadow gap. Keep the prep surface easy to wipe down.
Two tiers can make hosting easier, but they trade away one continuous work surface. Households that entertain often may value the separation; serious bakers who need a long, uninterrupted rolling area may prefer a single-height island. Judge the design by seating, clearance, wood care, and daily use, not appearance alone.
How the Seven Wood Kitchen Island Designs Compare
Seat counts are useful only when the island also leaves room to move and work. Compare the seating style with the wood's upkeep needs and the layout it requires. The figures below are practical ranges, not a substitute for measuring the available frontage and clearances.
| Item | Best For | Seating Capacity | Relative Cost | Maintenance Level |
|---|---|---|---|---|
| Butcher Block Island with Bar-Height Overhang | Food prep and casual dining | 3–4 | Mid-range to premium | Moderate; regular oiling and occasional refinishing |
| Live-Edge Slab Island with Waterfall Seating Edge | A distinctive focal point in modern or organic kitchens | 3–4 | High-end | Moderate; periodic resealing or oiling |
| Shaker-Style Wood Island with Open Shelving Seating End | Flexible style with storage and display space | 3 | Moderate to high | Moderate; regular cleaning and occasional touch-ups |
| Reclaimed Barn Wood Island with Trestle or Corbel Base | Rustic kitchens and sustainable design | 3–4 | Moderate | Moderate to high; clean grooves and reseal periodically |
| Mid-Century Modern Walnut Island with Tapered Legs | Modern kitchens and smaller spaces | 2–3 | Premium | Moderate; refresh oil finish periodically |
| Oak Island with Built-In Banquette or Bench Seating | Family kitchens and cozy dining areas | 4–6 | Moderate to high | Moderate; clean cushions and protect wood finish |
| Two-Tier Wood Island with Raised Bar and Lower Prep Counter | Larger kitchens needing separate prep and dining zones | 2–4 | High | Moderate; maintain both surfaces and clean prep area |
The seat count is only one part of the fit. Bar-height overhangs and raised tiers need sound support, while benches trade flexible stool placement for a fixed seating zone. Open shelves offer display space but need regular cleaning; reclaimed grooves can hold crumbs, and butcher block needs periodic oiling. In East Bay homes, consider daily use and the kitchen's layout before choosing a finish or seating arrangement.
Choosing the Right Wood Island for Your Kitchen
Start with the job the island does most days, not the style you saved most often. If it's daily prep plus quick meals, a butcher block or Shaker island at counter height usually gives you the best knee room and the easiest upkeep. If it's a social barrier between cook and guests, a two tier or banquette design earns its complexity. If the room is tight, a walnut furniture style island that seats two well beats a cabinet box that seats four badly.
Then test circulation with stools occupied, not tucked away. Tape the footprint, pull chairs out, open the dishwasher and refrigerator, and walk the main route with something in your hands. Multifunctional islands are now the expectation, and the Fixr 2025 kitchen trends report found that 42% of experts expected multifunctional storage islands to be a major 2025 trend. That only works when storage doors, seating, and traffic don't compete for the same inches.
My recommendation: Spend on overhang support, a repairable finish, and clearance before you spend on a rare species. Nobody praises exotic grain while their knees hit a cabinet.
Wood selection deserves the same hard look you'd give a dining table, and the dining wood advice from Slone Brothers Furniture reinforces why hardness and finish matter where people eat daily. In practice, hard maple takes stool contact well, oak hides wear in its grain, and walnut rewards owners who will refresh oil. Size also needs restraint. A Mercury News report on the 2024 Houzz kitchen survey noted that 42% of surveyed US kitchen renovators added an island at least 7 feet long, but length only helps if your room keeps clear work aisles after seating is in use.
For projects involving layout changes, cabinetry, or moving utilities, we handle design, permitting, and construction management across the East Bay. A kitchen project takes six to twelve weeks, and getting the seating dimensions locked before cabinets are ordered is what keeps that schedule realistic.
If you're planning a wood island and want the seating, clearance, and finish worked out before construction starts, NorCal Construction can design and build the island as part of a full kitchen remodel, including custom cabinetry, counters, and moving plumbing or electrical where needed. Reach out to talk through your room dimensions and get a plan that fits how your household cooks and gathers.